You've probably heard of Google Analytics and may be using it already. But have you heard of Google Tag Manager? Tag Manager gives you a huge amount of flexibility to measure events and add custom code to your pages without needing your Developer to do it for you. Here's some cool stuff you can do with Tag Manager...
What's in this article?
- What is Google Tag Manager?
- Why Use Google Tag Manager?
- Adding the Tag Manager code to your website
- Adding Google Analytics to Tag Manager
- Adding Events on links and buttons
- Adding HTML code for third party services
- Testing your changes
- Setting your changes live
- Conclusion
What is Google Tag Manager?
Google Tag Manager is a service that aims to give non-developers the flexibility to set up advanced analytics and tracking on their site, including the ability to add code snippets from other services like Google Analytics, Facebook Pixel, Tawk.to or any other service that requires you to add HTML to your web page.
Tag Manager has a steep learning curve at first due to it's complex and flexible nature, which is why I wanted to write this beginners article.
Below is the Tag Manager interface:

Why Use Google Tag Manager?
If you run a large website, or even a small one you can benefit by adding Tag Manager. You may have added Analytics Events in the past by adding javascript code to your anchor tags like this:
onclick="ga('send', 'event', 'Button', 'Click', 'Purchase Details');"
This will get the job done, but if you wanted to manage a lot of events it soon becomes a pain to keep editing the code in the site, even if you have access to the HTML. Also you may want to fire that event on multiple links that have a class and inline js like that is not ideal for many reasons.
In this article we'll show you how to do this with Tag Manager and then you can decide whether to take the plunge or not based on your requirements.
Adding the Tag Manager code to your website
You'll need a Google Account to login and add your website. Go to Tag Manager and create add your account here: https://tagmanager.google.com
To get your websites' Tag Manager code, click on the Google Tag Manager ID for your website at the top of the Tag Manager Screen:

This will then reveal the code to add to the site:

Adding Google Analytics to Tag Manager
In order to add Google Analytics we first define a custom variable, under "Variables" in the left hand navigation. Then, under "User-Defined Variables", click New.
Then add your Google Analytics Tracking ID as the variable name and under Variable Type, select "Google Analytics settings" and enter your Tracking ID:

You can then press Save.
The next thing to do is trigger that variable, so it activates every time someone visits a page. So we need to add a new "Tag", which can be done by clicking Tags in the left menu.
You can then click new, to add a new Tag. Give it a descriptive name and choose "Google Analytics: Universal Analytics" under the "Tag Type".
Then choose the Track Type to be Pageview and add choose your tracking ID from the dropdown. If it's not there, you didn't set the user defined variable correctly:

But a Tag needs a Trigger to fire. So the next thing to do is click to add a Trigger below this and choose "All Pages Pageview" trigger:
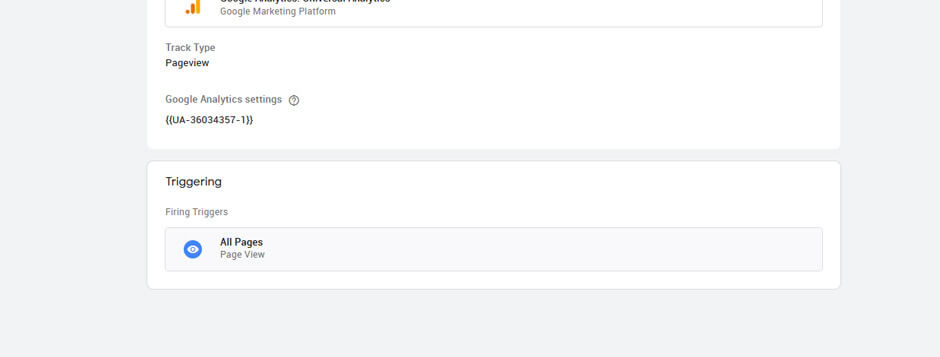
If you don't have that trigger added, you will need to go to Triggers on the left and click "New" to add it.
Adding Events on links and buttons
Imagine you want to track how many times someone clicks the social share links in your blog.
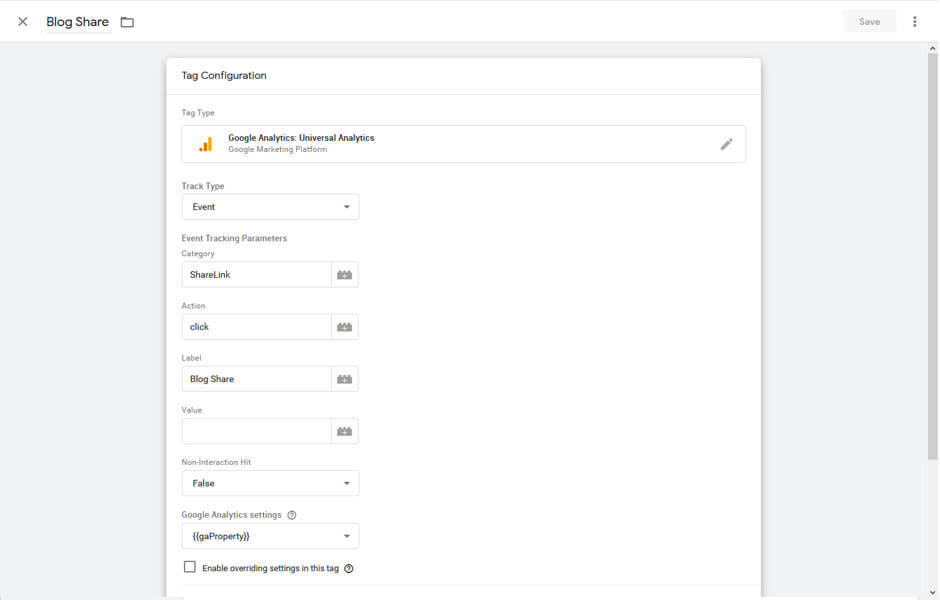
You could create a Tag called "Blog Share". You would choose to use your Universal Analytics under the Tag Type and choose Event under Track Type. You then complete the usual event tracking parameters and choose your GA Property:
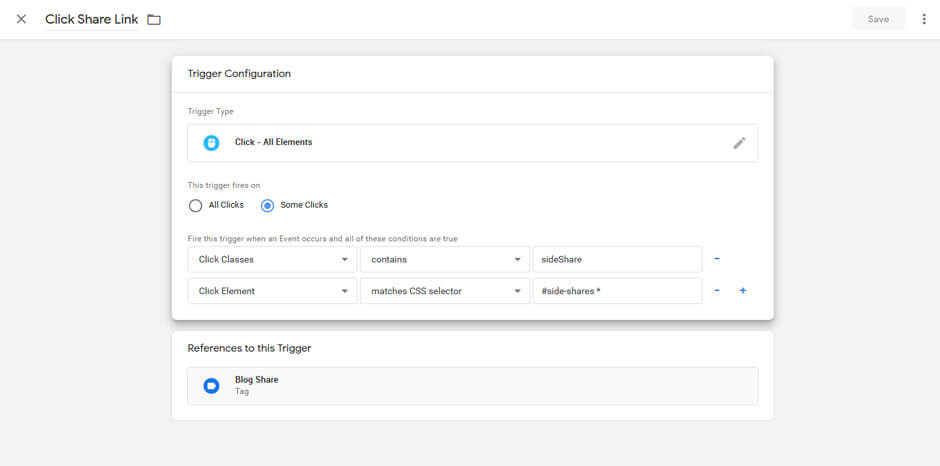
For the trigger, we can add a "Click - All Elements" Trigger Type and then refine it by matching just links with certain classes or an element ID:
Adding HTML code for third party services
You can also add tags with custom HTML for third party services such as Facebook pixel, Smartlook, Leadforensics etc. This is really easy, no need to ask a developer!
Simply trigger it on Page View so it works everytime someone loads a page on your site:

Testing your changes
Tag Manager has a great preview mode which allows you to check if your tags are firing when they should. To enter Preview mode, click the Preview button top right:

Once you click Preview, Tag Manager will show an orange note saying you are in Previewing the Workspace:
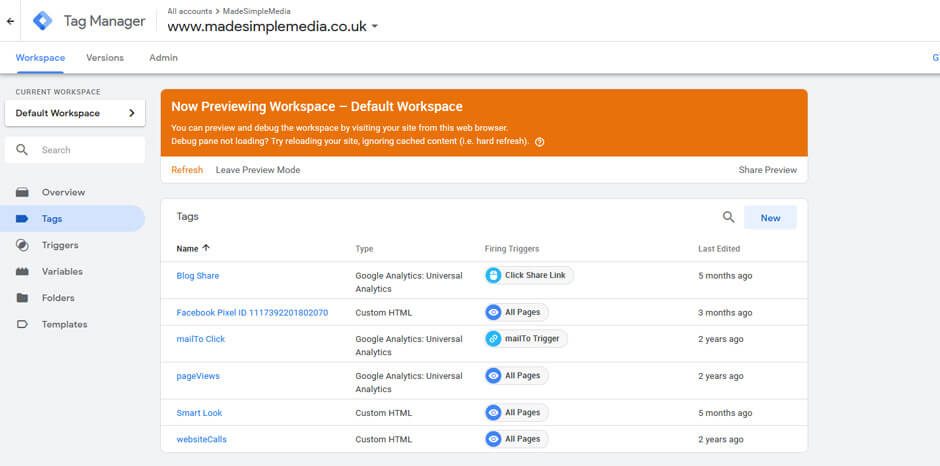
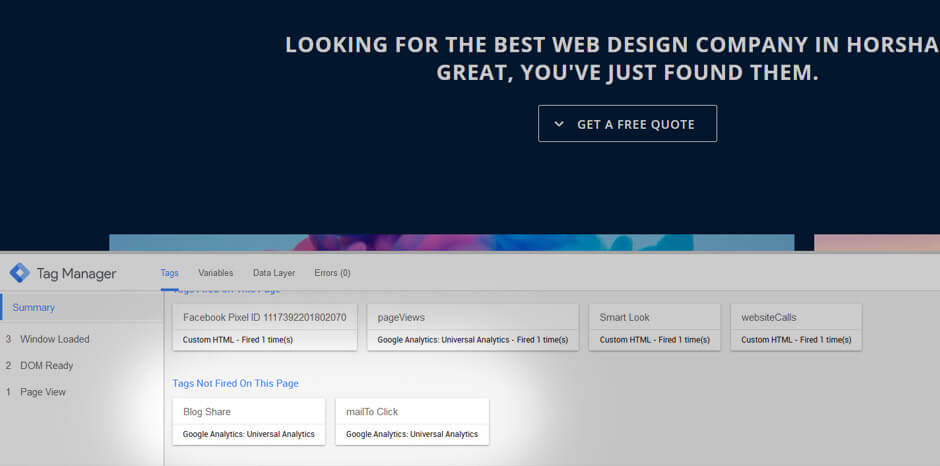
Now all you need to do is open another browser tab and go to your website. You'll notice when you do, there is a panel down the bottom that says "Tag Manager" on it. Within the panel, we can see that our Facebook PIxel is firing, as is our Google Analytics on page view and also Smart Look, which records visitors and our Website Calls tag:

We can also see that some of our Tags are not firing, e.g. Blog Share and mailTo Click. This is correct because Blog share only fires when someone clicks on a share link on a blog post. Also the mailTo click only fires when someone clicks on an email link to contact us:
We can test those tags by clicking a link such as a blog share link and they will then show that it is firing:

When you are happy, click "Leave Preview Mode" and it is time to Submit your Workspace changes:

Setting your changes live
If you are happy with your preview you can set your changes live by "Publishing your Workspace". To do this click on "Submit" top right:

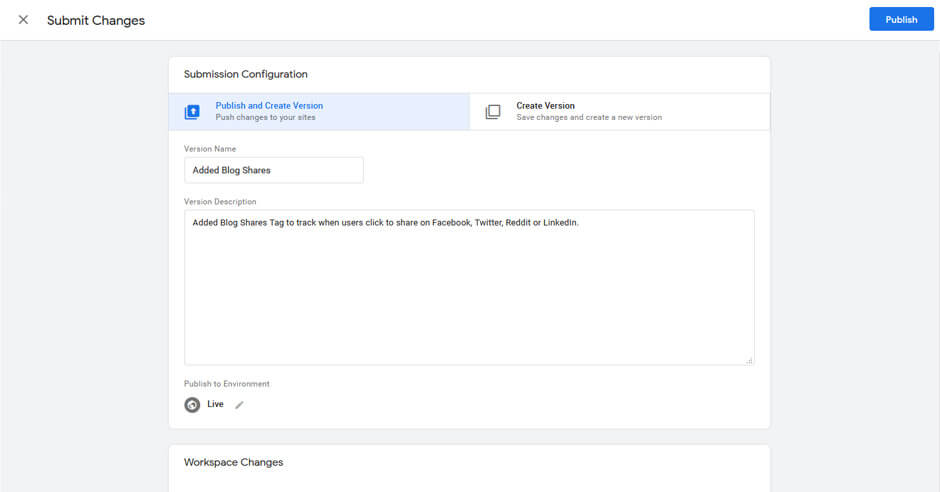
You are then asked for a Version Name and Description to detail what changes you made. Complete these fields and click Publish to put the changes live:
Conclusion
Google Tag manager takes a bit of getting used to with triggers, tags, variables etc but it's be worth it if you want to really delve into it's features and get powerful functionality without touching your websites' code all the time.
This is just a basic introduction to Tag Manager, there is far more you can do with it. Hopefully it helps to get you started and you find it useful.
Join the discussion
Want to have your say on this topic? Start by posting your comment below...
Can we help?
We are a digital agency, specialising in web design, development, hosting and digital marketing. If you need help with anything, feel free to reach out...
Get Blogging! Grow your website, grow your business!
24 February 2025
Boss your local SEO! Out perform your competitors in your area
18 February 2025
Keep up to date


